Imagine witnessing the immense delight in your guests’ eyes the first time they shake the resin shakers you’ve painstakingly crafted. There’s something inherently magical about incorporating a touch of DIY into your wedding day especially when it reflects your unique style and creativity. Resin shakers, with their charming, translucent beauty, are the perfect craft to bring your personal flair into reality. Not only do these little wonders serve as stunning decor pieces, but they also offer a delightful sound that resonates during your wedding celebration.
Resin shakers allow you the opportunity to leave your mark on every aspect of your wedding, from the first shake to the last dance. The personalization options are boundless, allowing you to tailor each shaker to your color palette, wedding theme, and unique tastes. You could incorporate tiny flowers that match your bridal bouquet, shimmering glitter that catches the light just right, or even a small charm that signifies something special to you both. The art of crafting resin shakers isn’t just a task, it’s a joyful experience that adds another layer of meaning to your special day.
Why Resin Shakers Will Light Up Your Wedding Reception
The moment your wedding guests step into the reception, they want to feel a sense of excitement and anticipation for what’s to come and resin shakers can help set the tone perfectly! These beautiful, handcrafted pieces aren’t just an eye-catcher; they create a sensory experience that adds more fun and interactivity to your wedding. By gifting resin shakers to your guests, you invite them to become actively involved in the celebration whether it’s cheering during the grand entrance, applauding during touching moments in your vows, or enhancing the joy of your first dance.
In fact, resin shakers can replace traditional noise-makers, such as bells or tambourines, with something much more elegant and meaningful. The soft, soothing sound they produce as your guests give them a gentle shake adds a touch of elegance to an already exquisite occasion. Not only do they look absolutely stunning when displayed on reception tables or hanging as ornate decorations, but they also make for wonderful keepsakes that your guests can bring home. Long after the wedding is over, those resin shakers become a lovely reminder of your special day forever shaking with memories in the hearts of your loved ones.
When considering wedding favors, you always want something practical yet memorable. Resin shakers, with their dual functionality, transcend the ordinary. They serve as a beautiful memento that your loved ones will cherish, making them feel included in every magical moment of your wedding day. Plus, with a little bit of planning, you can easily make enough resin shakers for all your guests, ensuring that everyone who attends your wedding gets to take part in this collective experience.
The Secret to Flawless Resin Shakers
To bring your vision of stunning resin shakers to life, gathering the right materials is crucial so let’s talk about what you’ll need. Creating resin shakers doesn’t require an art degree, but having the right tools and materials will make a world of difference in the end result.
To start, there are basic supplies needed across the board for any resin project:
- Epoxy Resin and Hardener: These two components are essential for creating a sturdy, clear, and glossy finish. Be sure to choose a non-toxic, UV-resistant resin to prevent yellowing over time. Go with one that has a curing time that suits your schedule.
- Silicone Molds: Since you’ll want your shakers to have interesting shapes and designs, silicone molds are a fantastic choice. They come in a variety of shapes, from hearts to stars, and their flexibility ensures easy removal.
- Mixing Cups and Stir Sticks: Precision is key; use these for properly mixing the resin and hardener. Avoid wooden stirrers as they might introduce bubbles that could ruin the smooth finish.
- Decorative Inclusions: This is where your vision for personalization really comes into play. Consider adding glitter, dried flowers, small beads, or charms that match your wedding colors and theme.
- Pigment or Dye: Many couples love adding a pop of color to their resin creations. Pigments and alcohol inks give you the opportunity to create a harmonious tie-in with your entire wedding palette.
- Protective Gear: Safety first! Gloves, a mask, and goggles will shield you from chemical exposure. Also, make sure to work in a ventilated area to ensure safety.
- Drill and Small Drill Bits: Depending on your design, you might want to add small holes in your resin shakers for threading with ribbons or hanging elements.
- Sealing Tape: Tape is useful for sealing molds or creating barriers to achieve more complex designs.
Once you have all your materials at the ready, you can begin creating your resin shakers. The process generally starts by mixing the epoxy resin and hardener in the right ratio until it becomes clear and free from bubbles. You’ll pour a small layer into your chosen molds, then add your chosen decorations or inclusions. This is where your creativity shines arrange your items carefully to ensure they are visible in the finished shaker. If required, you can add additional layers of resin and repeat the decorating process, finally filling the mold to the top.
Understanding Resin Basics
When creating Resin Shakers, I know there’s nothing more exciting than diving into a new craft full of potential. Imagining the beautiful, vibrant results is thrilling but understanding the basics of resin, especially as beginners, is key to making that dream a reality.
Whether you are crafting Resin Shakers to celebrate a wedding, commemorate a special moment, or gift something unique, starting your resin journey on the right foot is essential. Resin may initially seem like a daunting medium, but with a few practical tips, we can make this process smoother and more enjoyable.
First, selecting the right type of resin is crucial. In the world of Resin Shakers, the two most popular options are epoxy and UV resin. Epoxy resin is well-known for its durability, making it ideal for pieces that are meant to last. It offers a longer working time, which means you can take your time to get creative without worrying about the resin hardening too soon. On the other hand, UV resin cures quickly when exposed to UV light, which can be ideal for smaller projects or when you’re short on time.
Another important consideration is safety. Resin is fun and versatile, but it’s essential to think about safe working practices. Always work in a well-ventilated area, use gloves to protect your hands, and even consider a respirator mask if you’re working with large amounts of resin. It’s also wise to cover your workspace with a silicone mat or wax paper to prevent a sticky mess.
Also important to remember is that resin has a mind of its own. That means bubbles may form in your creations. To minimize them, try warming the resin slightly before you mix it. Also, using a simple blow torch or heat gun after pouring your resin will help to pop any bubbles for a smooth finish.
Choosing the Perfect Mold for Your Shaker
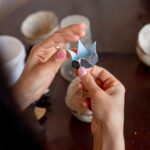
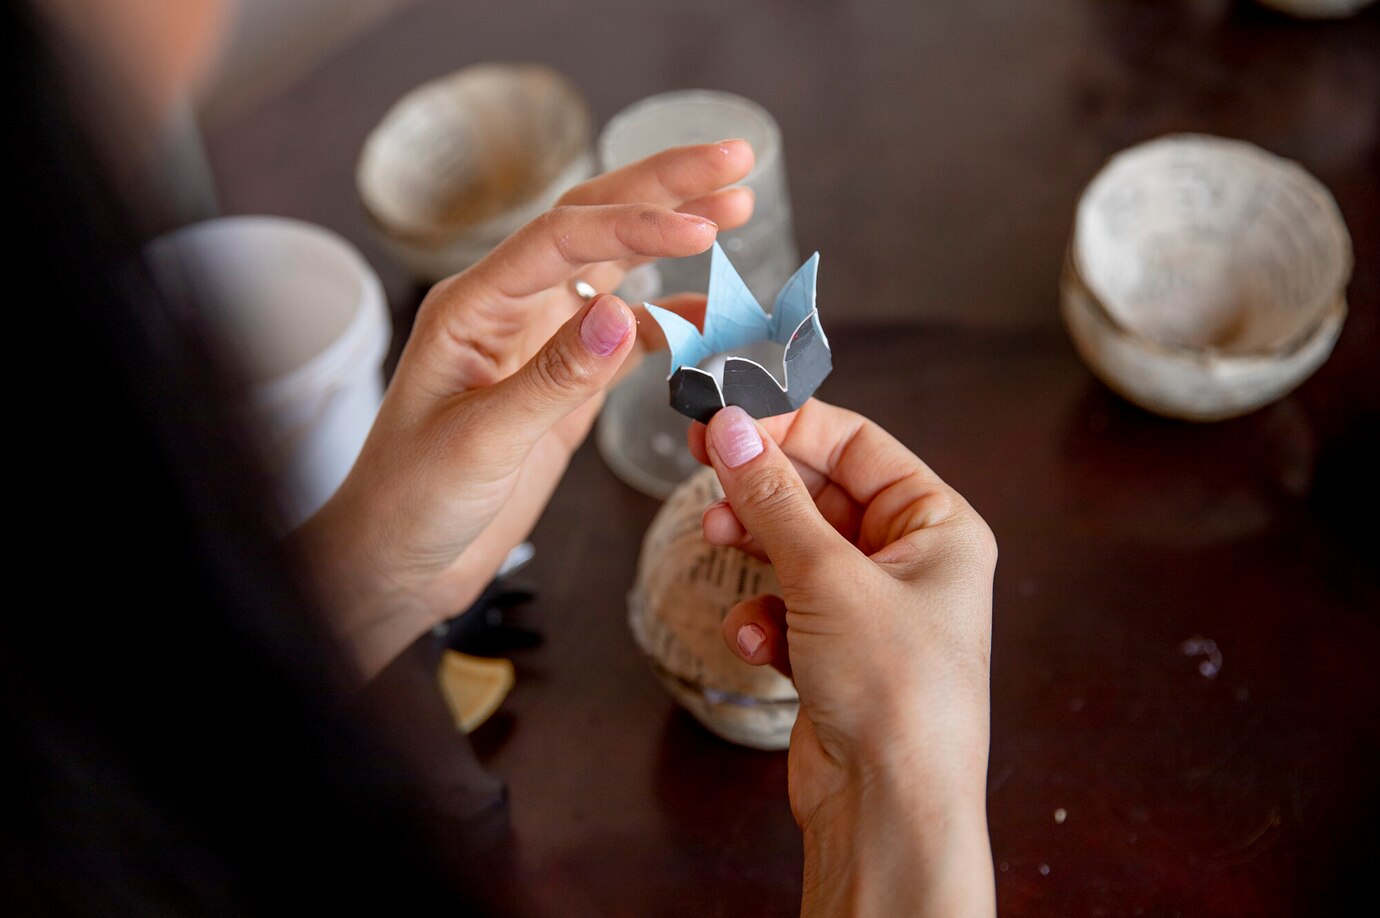
Choosing the right mold for your Resin Shakers is more than just a step in the process it’s an opportunity to set the tone and express your personality. The molds you select reflect the mood and spirit of your wedding or event; they become part of the story you’re telling.
When considering molds, the first thing to remember is that they are available in an extraordinary range of shapes and sizes, allowing you to give your Resin Shakers a completely personalized touch. Shaker molds come in popular forms such as hearts, stars, circles, and geometric designs, all radiating a charm that can reflect the love and joy of your special day.
If hearts symbolize romance for you, choosing a heart-shaped mold can serve as a beautiful token of affection, embodying the pure essence of wedding celebrations or memorable moments with your closest loved ones. I love when the mold I’ve selected resonates so closely with the theme of an event, creating magic that feels warm, nostalgic, and personal.
After you’ve decided on the overall shape, another hugely exciting consideration is the size of your Resin Shakers. Do you want each piece to be a delicate keepsake easily held in hand? Or are you envisioning grander, more intricate pieces that capture all eyes as centerpieces? Smaller molds are perfect for creating lovely keychains, small decorations, or favors for guests. Larger molds afford you the opportunity to make something bolder and spectacular.
One detail to not overlook is the quality of your molds. Silicone molds are your best friend here. They’re flexible, durable, and most importantly, non-stick, making the demolding process hassle-free. I always feel the thrill of anticipation when peeling a finished resin piece out of its mold – knowing that the effort and care I put into my creation has paid off beautifully.
But the creativity doesn’t stop there. It doesn’t always need to be about following a traditional shape; sometimes, the magic lies in exploring unconventional molds that resonate with your unique story. Whether it’s a beloved animal shape, a symbol of a shared hobby, or an abstract form that feels significant, the molds you choose have the power to transform your Resin Shakers into meaningful works of art.
Embellishing Your Resin Shakers with Heartfelt Details
The base of your Resin Shakers lays the foundation, but it is the embellishments that truly bring them to life. This is your opportunity to let your creativity soar by adding those romantic, heartfelt and fun touches to your shakers, making them unforgettable mementos.
One exciting addition involves adding glitter or mica powders. I love how glitter can make Resin Shakers sparkle in the most delightful way. Imagine a glimmering swirl of gold or silver catching the light just so, evoking the magical essence of a celebration. Adding mica powder to achieve a shimmering metallic effect brings a look of elegance that pairs perfectly with wedding themes.
For a more personalized approach, adding tiny treasures or trinkets that hold sentimental value can turn Resin Shakers into cherished heirlooms. Incorporate confetti in your wedding colors, small charms that symbolize love or initials that represent a union. Even pressed flowers from the wedding bouquet can add a poignant, natural touch, acting as a living memory of the day. How romantic would it be to enclose a delicate floral piece that not only adds beauty but brings a sweet sentimentality?
Another playful touch involves embedding items like small beads, seashells, or pearls. Such intricate details have a way of capturing precious memories, whether it’s a summer honeymoon by the ocean or an elegant wedding theme. When adding embellishments, sometimes less is more – a few meaningful items can add a rich, personal touch without overpowering the harmony of the piece.
Layering is another technique that allows you to create depth and dimension in your Resin Shakers. Pour resin in stages, curing each layer before adding the next. Doing this achieves a sort of suspended magic inside your shaker, where tiny details seem to float gracefully within. Being present during the creative process keeps the experience joyful – every layer, every tiny addition, tells a small part of the overall story.
Mastering the Art of Resin Curing
Curing resin is both an art and a science. The timing directly impacts the durability, clarity, and overall look of your resin shakers. Whether you’re exploring layers or intricate embedding, timing plays a significant role in how your final product turns out.
Understanding Resin Curing Times
Curing times can vary depending on the type of resin you’re using, ambient temperature, and the thickness of the pour. For your wedding, you’ll want your resin shakers to be durable and clear, so letting the resin cure properly is vital. Patience is key here, as rushing through this process may result in a shaker that’s cloudy or sticky to the touch.
Factors That Affect Curing
- Temperature: Resin generally cures faster at higher temperatures, but be careful, too much heat can cause cracks or bubbles. Keep the room at a stable temperature, ideally between 70°F and 85°F.
- Humidity: High humidity can slow down the curing process or cause unwanted reactions. Aim for a humidity level lower than 60% for best results.
- Resin Type: Different resins have different curing times. Some fast-curing resins allow you to demold in 6-8 hours, while others may require 24-48 hours. Always follow the manufacturer’s instructions.
Optimal Curing Strategies
To ensure that your resin shakers are ready in time for your wedding, consider planning your crafting schedule around the curing times. Start several days before your event for well-cured, flawless results.
- Layering: If your design includes multiple layers, allow each layer to partially cure before adding the next. This could take anywhere from a few hours to a full day, depending on the thickness of each layer.
- Heat Treatment: A gentle application of heat using a heat gun can help speed up the curing process and minimize imperfections like bubbles.
- Monitoring: Keep a close eye on your curing piece. This can prevent issues like dust or unwanted fingerprints from becoming a permanent part of your resin shaker.
Expert Tips for a Pristine Finish
Bubbles in resin can be an unwanted distraction, especially when crafting intricate designs for your wedding. Picture this: your guests shaking resin shakers filled with delicate glitter, flowers, or charms only to see bubbles ruining the clarity. Finding ways to minimize or eliminate these bubbles can bring your vision to life smoothly and beautifully.
Understanding How Bubbles Form
Bubbles typically form when air gets trapped in the resin, especially during mixing. The thicker the resin, the harder it is for air to escape. Understanding this can help you take the necessary steps to maintain a clear, pristine finish.
Common Causes of Bubbles
- Vigorous Mixing: Stirring the resin too quickly causes air to be trapped in the mixture.
- Pouring Technique: Pouring the resin too hastily can introduce bubbles into your design.
- Embedded Objects: Objects like flowers, charms, or confetti can trap air, leading to bubbles in the final piece.
Bubble-Free Resin
Now that you know what can cause bubbles, here’s what you can do to avoid them:
- Slow and Steady Mixing: Mix your resin slowly to avoid creating air pockets. Use a stirring stick and stir in smooth, circular motions, ensuring that you’re combining the resin and hardener without introducing excess air.
- Pouring Techniques: When it’s time to pour, do so from a low height. Pour slowly to minimize the amount of air that gets trapped.
- Handle Embeds With Care: Dab the surfaces of your embedded objects with a little bit of resin before inserting them. This helps seal them and reduces the likelihood of air being trapped underneath.
- De-Bubbling: Use a heat gun, torch, or even a hairdryer to gently pop any bubbles that come to the surface. Do this cautiously to avoid overheating the resin and creating imperfections.
- Vacuum Chamber: If bubbles are a recurring issue, consider using a vacuum chamber to degas your resin before pouring. This process helps remove air from the mixture, providing an even clearer final product.
Achieving a bubble-free finish will make your resin shakers not only beautiful but also emblematic of the care and detail you put into every element of your wedding day.
Creating Stirring Effects with Different Fillers
The beauty of resin shakers lies in their mesmerizing movement whether it’s glitter swirling or tiny charms floating playfully inside. Using different fillers allows you to create dynamic, customized effects that captivate your guests and become cherished keepsakes.
Choosing the Right Fillers
The fillers you choose will significantly impact the look and feel of your resin shakers. Whether you opt for glitter, beads, dried flowers, or small trinkets, these elements add both visual and emotional value.
Tips on Selecting Fillers
- Glitter: Glitter is always a popular choice for resin shakers due to its versatility and wide array of sizes and colors. You can use fine glitter for a subtle shimmer, or chunkier glitter for more dynamic, eye-catching movement.
- Beads: Tiny beads can add texture within the shaker. The color, shape, and weight of the beads can all contribute to the level of movement.
- Dried Flowers: Including dried flowers can result in a romantic, ethereal look. Keep in mind that dried flowers can sometimes trap air or moisture, so it’s essential to condition them beforehand to prevent bubbles or discoloration.
- Charms and Trinkets: Personalized charms anything from initials to tiny figures can add emotional significance to your shaker. They’re ideal for couples who want their shakers to reflect their personalities and what they love most.
Creative Techniques for Injecting Motion into Your Shakers
After selecting your fillers, the next step is to layer them into the resin in a way that creates compelling movement. Here are some techniques to try:
- Layered Pour: Add fillers between each layer of resin as you pour. This technique adds depth and helps achieve a smooth slide effect when the shaker is moved.
- Suspension Effect: Some fillers can be suspended in clear resin, giving the illusion of floating. This adds a 3D look and extra dimension to your shakers. You can achieve this by pouring a small layer, letting it cure slightly, and then adding your filler items before pouring more resin.
- Movement Gaps: Create small gaps or bubbles intentionally to promote motion once the shakers are assembled. The strategic placement of fillers can ensure that larger items move around or “shake” within the resin, adding to the interactive experience.
Creating resin shakers for your wedding involves careful planning, timing, and an understanding of how different elements come together to create a lasting impression. From mastering resin curing to preventing bubbles, and adding movement with the right fillers, your resin shakers can be a true reflection of the love and creativity shared on your special day. This commitment to the tiniest details is what will make your wedding day memories shine even brighter, offering a unique keepsake that commemorates not just your union but all the dreams, hopes, and hard work that went into making your celebration truly special.